Please note: The office will be closed between 14th-28th March for staff holidays. Please expect delays to shipping and enquiry responses during this time.
Roadside Unit Installation
While waiting to install, please keep your unit healthy by leaving in direct sunlight. An indoor south-facing window sill is ideal, but if placed outside please keep an air gap beneath the centre of the unit to prevent moisture ingress. Roadside units have been designed to be easy to install in 3 simple steps. Please read through and follow this guidance carefully.
1. Serial Number & checks
Before you start, make a note of the Roadside Unit serial number. This unique code can be found on the label on the rear of your roadside unit. You'll need this number when you come to register and activate the unit. Check the unit is healthy and, crucially, that you have chosen a good location.
2. Fitting
You must carefully assess the installation for risks and mitigate any risks to ensure you, and others, remain safe. Do not work unprotected at height. Have someone with you with a mobile phone. Wear high visibility jackets. Warn traffic as necessary. Follow the guidance and work practices given by the Health and Safety Executive.
If the location has pedestrian access (i.e. a pavement, pathway, etc) and is protected from traffic by a kerb or barrier, then you should be able to self-install with due care. You must comply with the Safety at Street Works and Road Works codes of practice. If the location is not protected (such as a verge) then you will need 'Chapter 8' NRSWA Unit 2 Signing, Lighting, and Guarding competencies for working near a roadway, or employ someone who is competent.
- Feed the fixing band through the slot on the unit.
- Position the unit against the pole with the camera window facing away from oncoming traffic (i.e. to the rear of traffic that has passed) at approximately 3m height, and tighten the fixing to just hold the unit in place.
- Swivel the unit on the pole so that the arrow on the base of the unit aligns with the centre of the lane being monitored 15-20m after the unit. Optionally, you can use the "Easy Align" feature with your smartphone to help align the unit:
- Gently tighten the fixing band – just until the unit is firm. Do not over-tighten the fixing, as this will damage the case.
- Note of the exact GPS coordinates of the unit (Google Maps™ is good for this).
- Note of the distance from the pole to the centre of the lane being monitored (see video for example), and height.
Installed! Now complete the form to register/activate your unit....
3. Registration/Activation
Registration/Activation should be done by your community speedwatch coordinator, and only after the unit is installed. This process also sets up the coordinator's account, who can subsequently invite volunteers from their community speedwatch group to help with the data produced. Register and activate your unit as follows:
If this is your first roadside unit and you've completed the installation steps above, please register and activate your roadside unit now. We will then configure, wake, and enable the unit, and send you login details for your account. If this is not the first unit you've installed then you can just activate it from your My AutoSpeedWatch account.
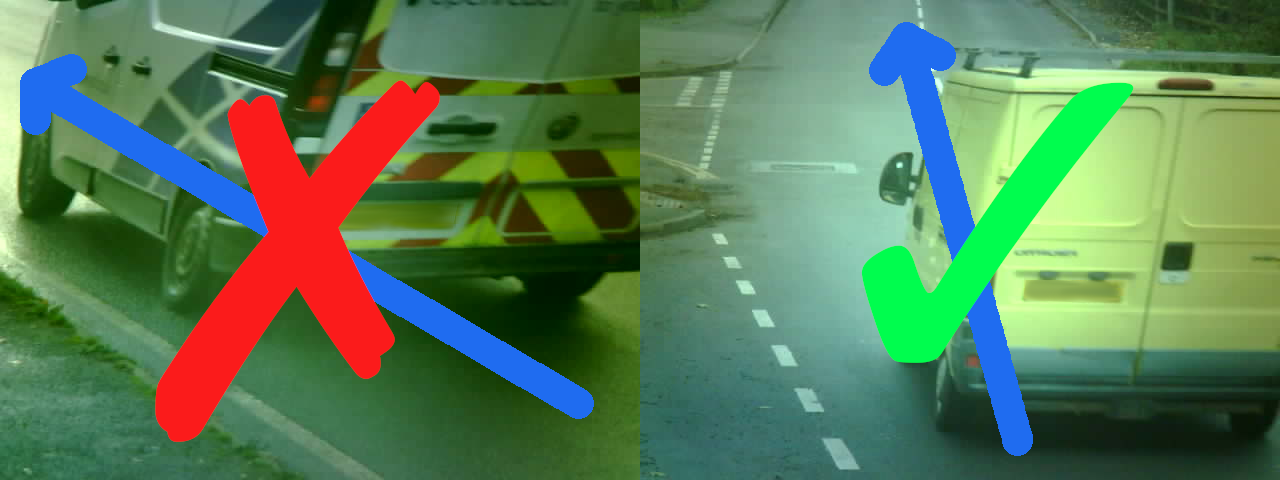
You may need to adjust the alignment of the unit after receiving the first images.....The images should be pointing well down the carriageway and not across it (see below). Use of the Tilt Adapter can help improve angles in unusual circumstances.